

Occlusion Culling
Occlusion Culling is a feature that disables rendering of objects when they are not currently seen by the camera because they are obscured by other objects. This does not happen automatically in 3D computer graphics since most of the time objects farthest away from the camera are drawn first and closer objects are drawn over the top of them (this is called "overdraw"). Occlusion Culling is different from Frustum Culling. Frustum Culling only disables the renderers for objects that are outside the camera's viewing area but does not disable anything hidden from view by overdraw. Note that when you use Occlusion Culling you will still benefit from Frustum Culling.
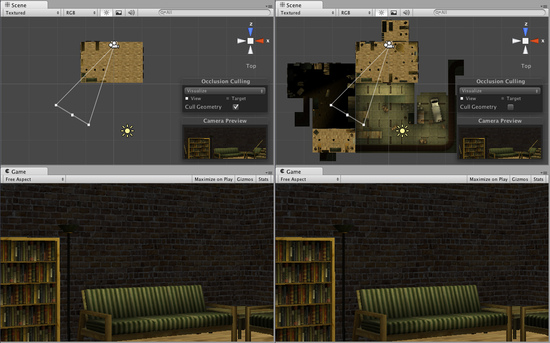
To the left, a scene with occlusion culling. To the right, the same scene without occlusion culling.
The occlusion culling process will go through the scene using a virtual camera to build a hierarchy of potentially visible sets of objects. This data is used at runtime by each camera to identify what is visible and what is not. Equipped with this information, Unity will ensure only visible objects get sent to be rendered. This reduces the number of draw calls and increases the performance of the game.
The data for occlusion culling is composed of cells. Each cell is a subdivision of the entire bounding volume of the scene. More specifically the cells form a binary tree. Occlusion Culling uses two trees, one for View Cells (Static Objects) and the other for Target Cells (Moving Objects). View Cells map to a list of indices that define the visible static objects which gives more accurate culling results for static objects.
It is important to keep this in mind when creating your objects because you need a good balance between the size of your objects and the size of the cells. Ideally, you shouldn't have cells that are too small in comparison with your objects but equally you shouldn't have objects that cover many cells. You can sometimes improve the culling by breaking large objects into smaller pieces. However, you can still merge small objects together to reduce draw calls and, as long as they all belong to the same cell, occlusion culling will not be affected. The collection of cells and the visibility information that determines which cells are visible from any other cell is known as a PVS (Potentially Visible Set).
Setting up Occlusion Culling
In order to use Occlusion Culling, there is some manual setup involved. First, your level geometry must be broken into sensibly sized pieces. It is also helpful to lay out your levels into small, well defined areas that are occluded from each other by large objects such as walls, buildings, etc. The idea here is that each individual mesh will be turned on or off based on the occlusion data. So if you have one object that contains all the furniture in your room then either all or none of the entire set of furniture will be culled. This doesn't make nearly as much sense as making each piece of furniture its own mesh, so each can individually be culled based on the camera's view point.
You need to tag all scene objects that you want to be part of the occlusion to Static in the Inspector. The fastest way to do this is to parent the objects you want to be Static to an Empty GameObject and set the parent as Static, choosing to affect children also when the option dialog appears on the screen. After they are tagged as Static you can unparent them from the Empty GameObject.
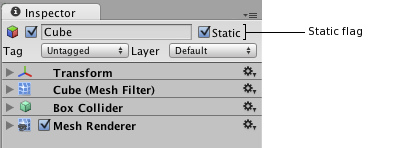
The Static checkbox in the Inspector
Next, open the Occlusion Culling inspector by clicking in .
In the Inspector, you will find several values to tweak. These values are described below:-
Occlusion Culling - Object
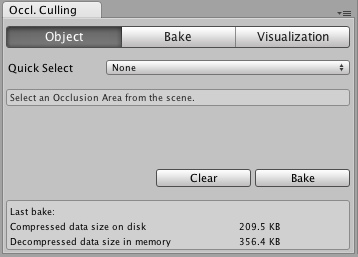
Occlusion culling inspector object tab.
The Object tab lets you create Occlusion Areas GameObjects. These areas let you specify where you want to use Occlusion culling.
NOTE: By default if you don't create any occlusion areas, occlusion culling will be applied to the whole scene.
Properties
| Quick Select | Lets you select/create an Occlusion Area and quickly modify it. |
| None | This is the default value. |
| Create New | Creates a new Occlusion Area GameObject. |
When you hit Create New in the Quick Select drop down, Unity will automatically create an Occlusion Area and will remove the default area (the whole scene). Now you can start tweaking your Occlusion Area(s) to suit your needs.
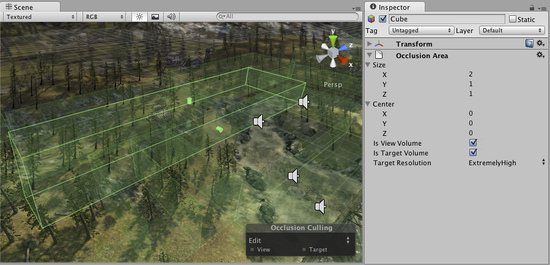
Occlusion Area inspector.
Properties
| Size | Defines the size of the Occlusion Area. |
| Center | Sets the center of the Occlusion Area. By default it is 0,0,0 and is located at the center of the box. |
| Is View Volume | Defines where the camera can be. Check this in order to occlude static objects that are inside this Occlusion Area. |
| Is Target Volume | Select this if you want to occlude moving objects. |
| Target Resolution | Determines how accurate the Occlusion Culling inside the area will be. This affects the size of the cells in an Occlusion Area. NOTE: This only affects Target Areas. |
| Low | This takes less time to calculate but is less accurate. |
| Medium | This gives a balance between accuracy and time taken to process the Occlusion culling data. |
| High | This takes longer time to calculate but has the better accuracy. |
| Very High | Use this value when you want to have more accuracy than high resolutions. Be aware that it takes more time. |
| Extremely High | Use this value when you want to have almost exact occlusion culling on your moveable objects. Note: This setting takes a lot of time to calculate. |
If the camera is out of a given occlusion area or any objects are outside the area, these objects will not be occluded.
Occlusion Culling - Bake
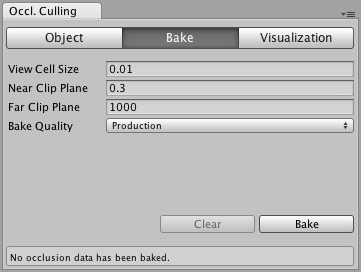
Occlusion culling inspector bake tab.
Properties
| View Cell Size | Size of each view area cell. A smaller value produces more accurate occlusion culling. The value is a tradeoff between occlusion accuracy and storage size |
| Near Clip Plane | Near clip plane should be set to the smallest near clip plane that will be used in the game of all the cameras. |
| Far Clip Plane | Far Clip Plane used to cull the objects. Any object whose distance is greater than this value will be occluded automatically.(Should be set to the largest far clip planed that will be used in the game of all the cameras) |
| Quality | Determines the quality/accuracy when occluding objects. |
| Preview | Use this during development (ie, it is inaccurate but will give you an idea of how the occlusion culling will behave in your game) |
| Production | Use this when you are deploying your game (it takes more time but is more accurate) |
When you have finished tweaking these values you can click on the Button to start processing the Occlusion Culling data. If you are not satisfied with the results, you can click on the button to remove previously calculated data.
Occlusion Culling - Visualization
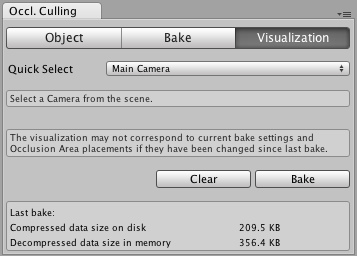
Occlusion culling inspector visualization tab.
Properties
| Quick Select | Lets you quickly select any camera in the scene to see how its Occlusion Culling will behave. |
The near and far planes define a virtual camera that is used to calculate the occlusion data. If you have several cameras with different near or far planes, you should use the smallest near plane and the largest far plane distance of all cameras for correct inclusion of objects.
All the objects in the scene affect the size of the bounding volume so try to keep them all within the visible bounds of the scene.
When you're ready to generate the occlusion data, click the button. Remember to decide between and on the Quality selection box in the Bake tab. is the quickest way to generate data and should be used to test your view areas in the authoring tool. should be used for a test run on your target platfrom (e.g. iPhone) when are you ready to release.
Bear in mind that the time taken to build the occlusion data will depend on the cell levels, the data size and the quality you have chosen. Unity will show the status of the PVS generation at the bottom of the main window.
After the processing is done, you should see some colorful cubes in the View Area. The colored areas are regions that share the same occlusion data.
Click on if you want to remove all the pre-calculated data for Occlusion Culling.
Moving Objects
To apply occlusion culling to moving objects you have to create an Occlusion Area and then modify its size to fit the space where the moving objects will be located (of course the moving objects cannot be marked as static).
After creating the Occlusion Area, just check the Is Target Volume checkbox to occlude moving objects.

Occlusion Area properties for moving objects.
| Size | Defines the size of the Occlusion Area. |
| Center | Sets the center of the Occlusion Area. By default this is 0,0,0 and is located in the center of the box. |
| Is View Volume | Defines where the camera can be. Check this in order to occlude static objects that are inside this Occlusion Area. |
| Is Target Volume | Select this when you want to occlude moving objects. |
| Target Resolution | Determines how accurate the occlusion culling inside the area will be. This affects the size of the cells in an Occlusion Area. NOTE: This only affects Target Areas. |
| Low | This takes less time to calculate but is less accurate. |
| Medium | This gives a balance between accuracy and time taken to process the occlusion culling data. |
| High | This takes longer to calculate but has better accuracy. |
| Very High | Use this value when you want to have more accuracy than high resolutions, be aware it takes more time. |
| Extremely High | Use this value when you want to have almost exact occlusion culling on your moveable objects. Note: This setting takes a lot of time to calculate. |
After you have added the Occlusion Area, you need to see how it divides the box into cells. To see how the occlusion area will be calculated on moving objects, you must select the and deselect the button in the Scene View while you have the Occlusion Culling Inspector open.
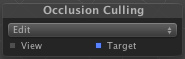
Selecting Target (moving objects) or View (static objects) lets you preview how the calculated data behaves.
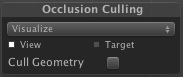
Testing the generated occlusion
After your occlusion is set up, you can test it by enabling the Cull Geometry option (in the Occlusion Culling window) and moving the Main Camera around in the scene view.
The Occlusion View mode in Scene View
As you move the Main Camera around (whether or not you are in Play mode), you'll see various objects disable themselves. The thing you are looking for here is any error in the occlusion data. You'll recognize an error if you see objects suddenly popping into view as you move around. If this happens, your options for fixing the error are either to change the resolution (if you are playing with target volumes) or to move objects around to cover up the error. To debug problems with occlusion, you can move the Main Camera to the problematic position for spot-checking.
When the processing is done, you should see some colorful cubes in the View Area. The blue cubes represent the cell divisions for Target Volumes. The white cubes represent cell divisions for View Volumes. If the parameters were set correctly you should see some objects not being rendered. This will be because they are either outside of the view frustum of the camera or else occluded from view by other objects.
After occlusion is completed, if you don't see anything being occluded in your scene then try breaking your objects into smaller pieces so they can be completely contained inside the cells.
Page last updated: 2011-05-19